Kubernetes Training
This assignment assumes that you have basic knowledge of the following topics:
- Docker
- Kubernetes
- Helm Chart
- Tilt
If you're not familiar with the mentioned topics, please check out Learn Docker in 7 Minutes. and Kubernetes Zero to Hero. For Helm Chart and Tilt, please watch this: What is Helm in Kubernetes? and checkout Tilt in two minutes.
Assignment 1: Install Docker and Minikube
-
Install Docker on Ubuntu or [Docker on macOS] (https://docs.docker.com/desktop/install/mac-install/) : Follow the Docker Documents to install Docker, but if you already have Docker, please go to the next step.
-
Install Minikube: Follow the instructions in the Minikube documentation to install Minikube and start a Kubernetes cluster.
For Linux system, after you finish installing Minikube, run this command:
minikube start
For MacOS, run the following commands.
brew install qemu

brew install socket_vmnet

sudo brew services start socket_vmnet

minikube start --vm --driver=qemu
We install qemu and socket_vmnet in MacOS because there is a problem when getting the IP address of the Minikube. Using both of these tools will fix this particular issue.
Assignment 2 : Deploy Demo App on Kubernetes
In this assignment, you are going to deploy demo-app and mongodb together on the Kubernetes cluster (Minikube).
-
Create a folder named 'demo-app'.
-
Use Kubectl to deploy applications and inspect a deployment.
-
Create a Demo-App Deployment File:
demo-app-deployment.yaml:
apiVersion: apps/v1
kind: Deployment
metadata:
  name: webapp-deployment
  labels:
    app: webapp
spec:
  replicas: 1
  selector:
    matchLabels:
      app: webapp
  template:
    metadata:
      labels:
        app: webapp
    spec:
      containers:
        - name: webapp
          image: jusjira/k8s-demo-svelte-webapp:v1.1
          ports:
            - containerPort: 3000
          env:
            - name: USER_NAME
              valueFrom:
                secretKeyRef:
                  name: mongo-secret
                  key: mongo-user
            - name: USER_PWD
              valueFrom:
                secretKeyRef:
                  name: mongo-secret
                  key: mongo-password
            - name: DB_URL
              valueFrom:
                configMapKeyRef:
                  name: mongo-config
                  key: mongo-url
---
apiVersion: v1
kind: Service
metadata:
  name: webapp-service
spec:
  type: NodePort
  selector:
    app: webapp
  ports:
    - protocol: TCP
      port: 3000
      targetPort: 3000
      nodePort: 30100
- Create a Database Deployment File:
Defines database configuration variables for the application by creating a
ConfigMap file named mongo-config.yaml:
apiVersion: v1
kind: ConfigMap
metadata:
  name: mongo-config
data:
  mongo-url: mongo-service
Next, create a MongoDB secret manifest. However, values in the secret file cannot be in plain text; they must be encoded in base64. Therefore, execute the following commands:
echo -n mongouser | base64 # result: 'bW9uZ291c2Vy'
echo -n mongopassword | base64 # result: 'bW9uZ29wYXNzd29yZA=='
Create a Secret Configuration File, mongo-secret.yaml:
apiVersion: v1
kind: Secret
metadata:
  name: mongo-secret
type: Opaque
data:
  mongo-user: bW9uZ291c2Vy
  mongo-password: bW9uZ29wYXNzd29yZA==
Create a MongoDB deployment file, mongo-deployment.yaml:
apiVersion: apps/v1
kind: Deployment
metadata:
  name: mongo-deployment
  labels:
    app: mongo
spec:
  replicas: 1
  selector:
    matchLabels:
      app: mongo
  template:
    metadata:
      labels:
        app: mongo
    spec:
      containers:
        - name: mongodb
          image: mongo:5.0
          ports:
            - containerPort: 27017
          env:
            - name: MONGO_INITDB_ROOT_USERNAME
              valueFrom:
                secretKeyRef:
                  name: mongo-secret
                  key: mongo-user
            - name: MONGO_INITDB_ROOT_PASSWORD
              valueFrom:
                secretKeyRef:
                  name: mongo-secret
                  key: mongo-password
---
apiVersion: v1
kind: Service
metadata:
  name: mongo-service
spec:
  selector:
    app: mongo
  ports:
    - protocol: TCP
      port: 27017
      targetPort: 27017
Apply the deployment:
kubectl apply -f mongo-config.yaml

kubectl apply -f mongo-secret.yaml

kubectl apply -f mongo-deployment.yaml

kubectl apply -f demo-app-deployment.yaml
kubectl get all
- Validate Deployment
You can view the deployments using the following command.
kubectl get deployments
The expected output is something similar to
NAME               READY   UP-TO-DATE   AVAILABLE   AGE
webapp-deployment   1/1     1            1           1m
mongo-deployment    1/1     1            1           1m
...
In case something does not work as expected, use the following command to view the cluster events (deployment log).
kubectl get events
Click here to learn more about the basic minikube command!
Lastly, let's check whether our app is working or not.
minikube ip

curl 'http://<minikube-ip>:<NodePort>'
The output of using curl should look like this:
<!doctype html>
<html lang="en">
  <head>
    <meta charset="utf-8" />
    <link rel="icon" href="./favicon.png" />
    <meta name="viewport" content="width=device-width, initial-scale=1" />

    <link href="./_app/immutable/assets/2.CWuKNWhM.css" rel="stylesheet" />
  </head>
  <body data-sveltekit-preload-data="hover">
    <main style="display: contents">
      <div class="container svelte-1clktwp">
        <h1 data-svelte-h="svelte-1daz3k7">Todo Demo</h1>
        <form
          method="POST"
          action="?/ad
d"
          data-svelte-h="svelte-12y1h05"
        >
          <input type="text" placeholder="Add a new todo" name="todo" />
          <button type="submit">Add</button>
        </form>
      </div>

      <script>
        {
          __sveltekit_1iahxlq = {
            base: new URL('.', location).pathname.slice(0, -1),
          }

          const element = document.currentScript.parentElement

          const data = [null, { type: 'data', data: { todos: [] }, uses: {} }]

          Promise.all([
            import('./_app/immutable/entry/start.C06W6U1C.js'),
            import('./_app/immutable/entry/app.C1U4DMOZ.js'),
          ]).then(([kit, app]) => {
            kit.start(app, element, {
              node_ids: [0, 2],
              data,
              form: null,
              error: null,
            })
          })
        }
      </script>
    </main>
  </body>
</html>
Or you can access the demo web application through browser.

In conclusion, this below diagram shows what happens inside the cluster.

Assignment 3: Create a Helm Chart and Deploy
- Install Helm: Follow the Helm installation instructions to install Helm on your system.
- Create a Helm Chart: Create a new directory named
demo-app-chartand navigate to it. Inside this directory, run:
helm create demo-app
-
Edit Chart Values: Update
demo-app-chart/demo-app/values.yamlto custom values like image repository, port, and MongoDB credentials.Next, in the
demo-app-chart/demo-app/templatesfolder, you need to configuredevelopment.yamland then create a new file nameddb-deployment.yaml.
Inside db-deployment.yaml
apiVersion: apps/v1
kind: Deployment
metadata:
  name: main-mongo-deployment
spec:
  replicas: {{ .Values.mongo.replicaCount }}
  selector:
    matchLabels:
      app: mongo
  template:
    metadata:
      labels:
        app: mongo
    spec:
      containers:
        - name: mongodb
          image: '{{ .Values.mongo.image.repository }}:{{ .Values.mongo.image.tag }}'
          ports:
            - containerPort: {{ .Values.mongo.service.port }}
          env:
            - name: MONGO_INITDB_ROOT_USERNAME
              valueFrom:
                secretKeyRef:
                  name: {{ .Values.mongo.secret.name }}
                  key: {{ .Values.mongo.secret.userKey }}
            - name: MONGO_INITDB_ROOT_PASSWORD
              valueFrom:
                secretKeyRef:
                  name: {{ .Values.mongo.secret.name }}
                  key: {{ .Values.mongo.secret.passwordKey }}
Inside deployment.yaml, you have to configure it like this:
apiVersion: apps/v1
kind: Deployment
metadata:
  name: {{ include "demo-app.fullname" . }}
  labels:
    {{- include "demo-app.labels" . | nindent 4 }}
spec:
  {{- if not .Values.autoscaling.enabled }}
  replicas: {{ .Values.replicaCount }}
  {{- end }}
  selector:
    matchLabels:
      {{- include "demo-app.selectorLabels" . | nindent 6 }}
  template:
    metadata:
      {{- with .Values.podAnnotations }}
      annotations:
        {{- toYaml . | nindent 8 }}
      {{- end }}
      labels:
        {{- include "demo-app.labels" . | nindent 8 }}
        {{- with .Values.podLabels }}
        {{- toYaml . | nindent 8 }}
        {{- end }}
    spec:
      {{- with .Values.imagePullSecrets }}
      imagePullSecrets:
        {{- toYaml . | nindent 8 }}
      {{- end }}
      serviceAccountName: {{ include "demo-app.serviceAccountName" . }}
      containers:
        - name: {{ .Chart.Name }}
          securityContext:
            {{- toYaml .Values.securityContext | nindent 12 }}
          image: "{{ .Values.image.image.repository }}:{{ .Values.image.image.tag | default .Chart.AppVersion }}"
          imagePullPolicy: {{ .Values.image.pullPolicy }}
          env:
            - name: USER_NAME
              valueFrom:
                secretKeyRef:
                  name: {{ .Values.image.env.secret.name }}
                  key: {{ .Values.image.env.secret.userKey }}
            - name: USER_PWD
              valueFrom:
                secretKeyRef:
                  name: {{ .Values.image.env.secret.name }}
                  key: {{ .Values.image.env.secret.passwordKey }}
            - name: DB_URL
              valueFrom:
                configMapKeyRef:
                  name: {{ .Values.image.env.configMap.name }}
                  key: {{ .Values.image.env.configMap.urlKey }}
          ports:
            - name: http
              containerPort: {{ .Values.image.service.targetPort }}
              protocol: TCP
          livenessProbe:
            {{- toYaml .Values.livenessProbe | nindent 12 }}
          readinessProbe:
            {{- toYaml .Values.readinessProbe | nindent 12 }}
          resources:
            {{- toYaml .Values.resources | nindent 12 }}
          {{- with .Values.volumeMounts }}
          volumeMounts:
            {{- toYaml . | nindent 12 }}
          {{- end }}
      {{- with .Values.volumes }}
      volumes:
        {{- toYaml . | nindent 8 }}
      {{- end }}
      {{- with .Values.nodeSelector }}
      nodeSelector:
        {{- toYaml . | nindent 8 }}
      {{- end }}
      {{- with .Values.affinity }}
      affinity:
        {{- toYaml . | nindent 8 }}
      {{- end }}
      {{- with .Values.tolerations }}
      tolerations:
        {{- toYaml . | nindent 8 }}
      {{- end }}
Inside the values.yaml file
mongo:
  replicaCount: 1
  image:
    repository: mongo
    tag: 5.0
  service:
    type: ClusterIP
    port: 27017
  secret:
    name: mongo-secret
    userKey: mongo-user
    passwordKey: mongo-password

image:
  replicaCount: 1
  image:
    repository: jusjira/k8s-demo-svelte-webapp
    tag: v1.1
  service:
    type: NodePort
    port: 3000
    targetPort: 3000
    nodePort: 30100
  env:
    secret:
      name: mongo-secret
      userKey: mongo-user
      passwordKey: mongo-password
    configMap:
      name: mongo-config
      urlKey: mongo-url

service:
  nodePort: 30200
  port: 30000
  protocol: TCP
  targetPort: 30000
  type: NodePort

resources:
  requests:
    cpu: 50m
    memory: 128Mi
  limits:
    cpu: 100m
    memory: 256Mi

serviceAccount:
  create: true

autoscaling:
  enabled: true
  maxReplicas: 5

replicaCount:
  webapp: 1
  mongo: 1

ingress:
  enabled: false
  hostname: webapp.example.com
  path: /

persistence:
  enabled: false
After that, run:
# ...(navigate inside the helm chart directory)
helm lint .
To line the chart for possible issues, use helm lint. The expected output
will be something like this.
==> Linting ./demo-app
[INFO] Chart.yaml: icon is recommended.

1 chart(s) linted, 0 chart(s) failed
- Deploy with Helm: Navigate to the parent directory of your chart and run:
helm install demo-app ./demo-app-chart/demo-app
- Validate Deployment: After running the command in step 4, please follow the steps illustrated in the snippet below to obtain the URL and access the website.
NAME: demo-app
LAST DEPLOYED: Fri Mar 22 14:14:21 2024
NAMESPACE: default
STATUS: deployed
REVISION: 1
NOTES:
1. Get the application URL by running these commands:
  export NODE_PORT=$(kubectl get --namespace default -o jsonpath="{.spec.ports[0].nodePort}" services demo-app)
  export NODE_IP=$(kubectl get nodes --namespace default -o jsonpath="{.items[0].status.addresses[0].address}")
  echo http://$NODE_IP:$NODE_PORT
Assignment 4: Create a Development Setup using Tilt with a Helm chart
- Install Tilt: Follow Tilt's installation instructions to install Tilt on your system.
- Create a Tilt File: In your application's directory, create a file named
Tiltfile:
k8s_yaml(
  helm(
    './demo-app-chart/demo-app',
    name='demo-app',
  ),
)
- Run Tilt: Open a terminal in your application's directory and run:
tilt up
Tilt will build and deploy your application using the Helm chart.
- Validate Development Environment: If everything works perfectly, you will see the web UI after you run the tilt command.
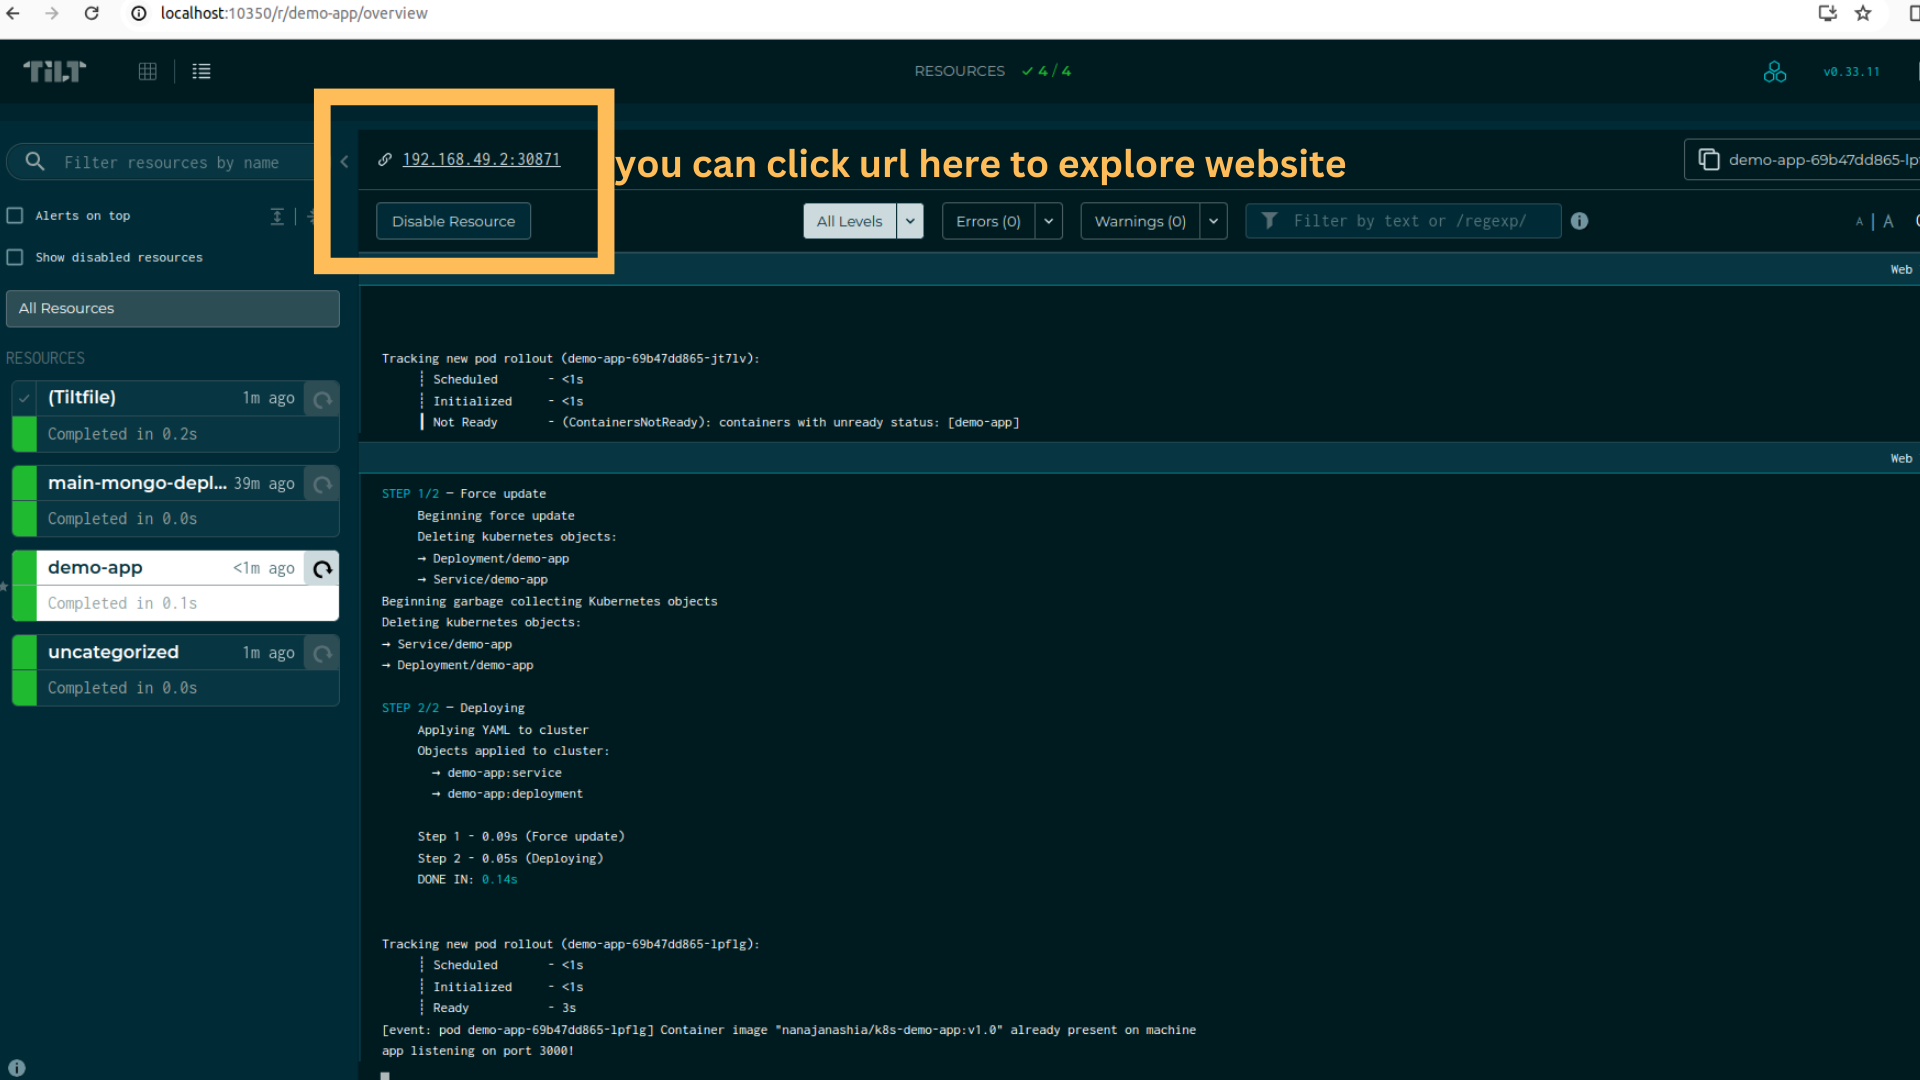
Validate that the development setup is functional by making a small modification to your demo application. For example, you can try modifying the port number (don't forget that you also have to change the port in other files!).
After you save all the files you modified, go back to the web UI. You should observe that Tilt automatically builds an image, deploys it to a cluster, and then reloads the application for you.
Run the kubectl command again, and you should see that your application
applies the new port instead of the old ones.
$ kubectl get deployment

# expected return output
  NAME           READY   UP-TO-DATE   AVAILABLE   AGE
  demo-app        1/1     1            1           1m
    ...
-----
$ kubectl get services

# expected return output
NAME                        TYPE        CLUSTER-IP       EXTERNAL-IP   PORT(S)          AGE
webapp-service              NodePort    10.109.82.132    <none>        3000:30100/TCP   7d12h
mongo-service               ClusterIP   10.100.63.225    <none>        27017/TCP        7d13h
...
Try changing other things on your own and see how tilt works!
Congratulations! 🥳😃 You've successfully completed the Kubernetes tutorial. In this course, you have learned
- How to install and setup Docker and Minikube ✔️
- How to deploy our application to Kubernetes ✔️
- How to create and setup a helm chart ✔️
- How to install and setup tilt ✔️
This should provide you with a solid foundation for working with container technology and managing your application's deployment.